How often do you feel wrist pain in yoga? Let’s improve that with these suggestions for relief.
by Gwenn Jones, CPT
June 15, 2023
Improving hand placement in your yoga practice can be the difference between wrist hell or, ahhh, mo better.
Stressed wrists are something we all feel occasionally. First, respect the signs of when to back off for a moment or two. Try your pose again.
Why me?
Wrist pain can be the result of weakness, stiffness, or incorrect hand placement. Or, it can relate to carpal tunnel, tendinitis, arthritis, etc. This article addresses the first challenge to minimize wrist pressure.
To maintain safety and comfort in weight-bearing yoga postures, hand placement is king. Aside from our wrists, proper hand mechanics in our postures contribute to sturdy joint alignment.
Today let’s learn or re-learn proper hand placement until it becomes a habit. And, I assure you it will.
Identifying a culprit
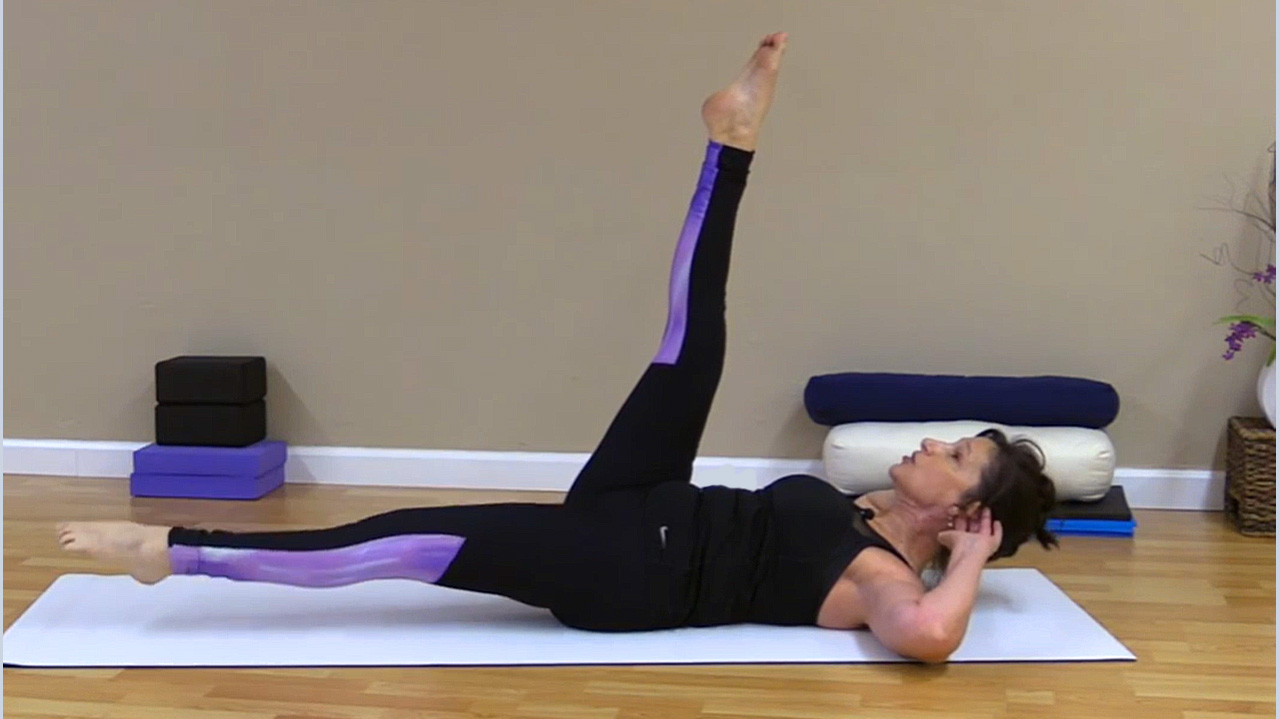
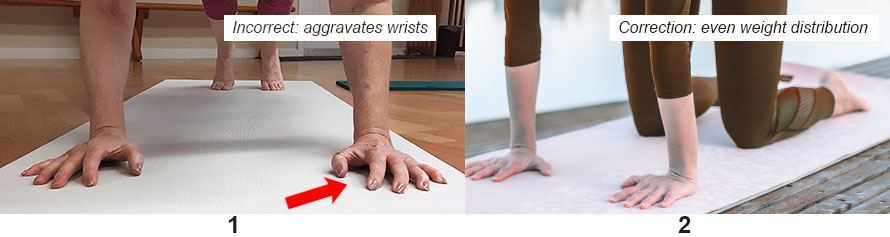
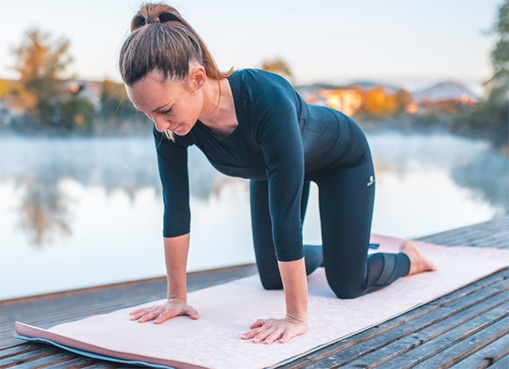
Newish yogis inevitably put more weight on the heels of the hands in asanas (yoga postures) such as downward facing dog, plank, and table-top (image 2). It’s natural in our innate attempt to hold ourselves up. We’re in a position that is alien to us. This creates wrist pain and misalignment issues.
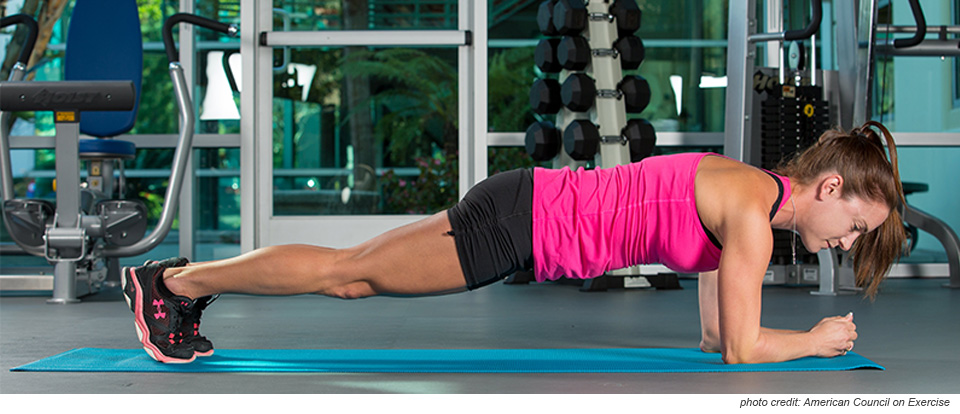
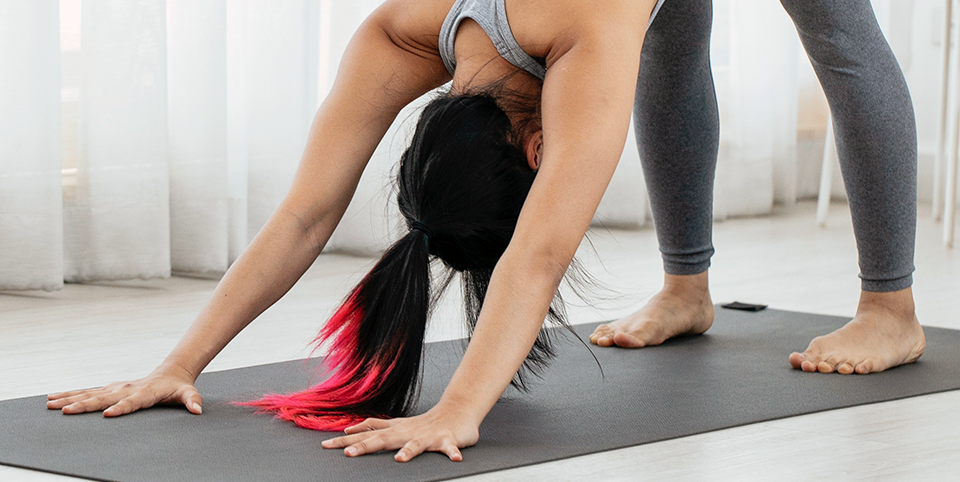
Likewise, with weight on our wrists, we tend to tilt or list our hands. This pushes pressure to the pinky (ulnar) side of the hand. The thumb (radial) side responds and lifts (image 1). This is double trouble.
Practice in gentle Table-top pose for optimal hand setting
Mentally, part of a better practice is diving deeper into attentiveness. I won’t use the term awareness because it’s so commonplace it flies out the ears without reaction. So, let’s focus your focus (that’s not a typo).
Physically, the easiest example pose here would be in an all-fours/table-top posture (Bharmanasana, image 2). I’ll skip the details since you should know the pose.
Let’s tweak the hand placement mechanics for your comfort
Yoga coaches usually encourage our hands to be “shoulder-width apart.” Respectfully, this is not incorrect. But it is often a bit too close for those with shoulder challenges. Since I coach adults and seniors, those with former or current shoulder concerns comprise one-fourth of my incoming students — and the general public. We all know someone, right?
I’ll clarify here. A too-close distance between the hands in downward dog, plank, or tabletop pose often results in internal rotation of the upper arm. Specifically where our humerus bone meets the shoulder (the glenohumeral joint if you’re interested). This internal rotation, together with pressure, can cause chronic strain, or even injury. The following thoughtful hand adjustments will better accommodate your shoulders. Specifically, during the plank-to-chaturanga* part of a sun salutation.
(*Chaturanga: the lowering of the chest between the hands as the body becomes parallel to the mat.)
Inserting minor tweaks to respect our individual physiques will increase comfort. I’ll address that shortly.
Set up from a basic table-top preparation
Start in your standard table-top posture for easy prep.
Knees aligned under hips, hands aligned under shoulders:
- Spread your fingers as wide as possible and extend them fully
- Press your index and thumb bases firmly down, as flat as possible
- Middle finger points straight forward (approximately)
- Press the finger pads down
- Draw your shoulders down your back, away from your ears
You’ll feel the center of your palm cup away slightly as the perimeter of your palm presses down – that’s correct. Feel your arms engage. Rock back and forth a few times to familiarize the feel.
Relax, release, then repeat a few times. Let’s prepare to go somewhere.
Technique tweaks for downward dog preparation (weight-bearing)
Use your hand mechanics as above, but:
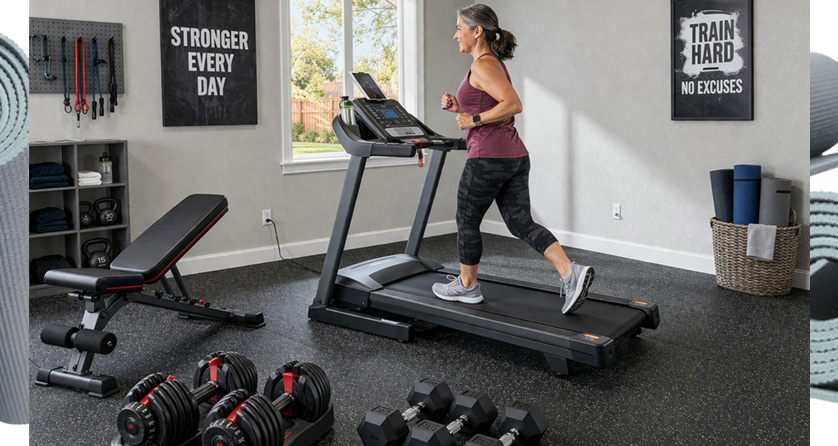
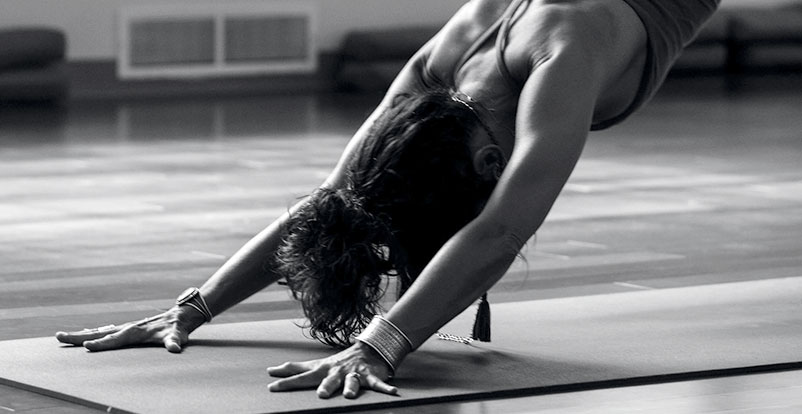
- Move your hands one inch farther apart, i.e., a tiny bit wider than shoulder width (image 3)
- Keep your finger pads, index, and thumb bases sticky’d to the mat
- Turn your hands a tiny bit outward (image 3)
- Now your index finger is likely pointing forward
- Give a slight forward swirl (or roll) of your upper arms without moving your hands
You’ll now find your biceps and inner elbows facing front instead of inwards toward your ribs**. This is standard upper arm position and is often ignored, or not understood, by new yogis.
**Note: if your biceps face inward to the ribs, the shoulders are internally rotated and not stable. It’s an unsafe strain on the rotator cuffs for any weight-bearing movement.
These tweaks encourage chest openness, shoulder girdle stabilization, and healthy wrist distribution. Be mindful that your arms are micro-bent, or straight without elbow lock. Practice this a few times. You should also feel your upper back engage with these corrections (see image 3, her shoulders and upper back are fully engaged). Hold that engagement.
3
Communicate with your yoga instructor. Ask for guidance. That’s why we’re here. A strong yoga practice does not require silence.
Now try your downward dog
Hold your focus here – hands, fingers, arms. Focus is paramount in any physical practice.
- Tuck your toes and lift your hips a bit (on an inhale)
- Pull your tailbone up and backward (on exhale) to achieve a downward dog pose
As your tail draws backward, your chest moves closer to your knees. Take your time and don’t worry about straightening your legs for now. Slide your shoulders down your back. Hold your down dog pose and retain your hand placement.
To intensify, but not for first-time down doggers:
- Gently press your mat forward with your hands. You will feel your upper back engage more.
- To further engage the upper back and arms, lightly stretch your mat apart from the midline (i.e., traction between your hands). This moderate tension incorporates the upper back and arm musculature like beautiful music.
Rest
Lift your heels and lower your knees slowly. Try more downward facing dogs.
In a short time, your planks, chaturangas, and cobras will rock too.
Reap the benefits of efficient hand practice in yoga
Proper hand technique sets up an even weight distribution to assure joint alignment. This charges up the forearms, elbows, and shoulders. Clinging to good habits fortifies our bodies so we can enjoy our practice long-term.
Use these hand placement rules to correct off-kilter situations. You’ll discover refinements as your practice progresses. Once you’re confident, you can play with the intensity hints I noted. Relish the joy and progressive power of your own body.
As mentioned above, continue to draw your tail backward and stabilize your core in down dog. This pulls pressure away from the hands. With more practice and slammin’ good form, your wrists and forearms will strengthen. As will your entire body. Until then, be patient with yourself.
It’s not about perfection, it’s about progress. Isn’t everything?
More tips for yoga safety and comfort
- Always warm up your wrists like we warm the body for yoga practice.
- Ground your forearms as a modification to downward dog (this is the Dolphin pose)
- Using blocks under your hands will bring the ground closer to you shifting more weight away from your wrists and backward into your legs
- Engage your core and lengthen the spine consistently. Besides the obvious, you become more weightless
- Yoga Jellies are helpful to those with severe wrist issues (available on Amazon)
- Wrist-strengthening exercises will help. I’ll tackle that next!
Namasté
Need more tips? Contact me.

Article by:
Gwenn Jones, CPT — Content writer in Wellness-Lifestyle-Fitness, Gwenn is a 25-year ACE-certified personal fitness trainer, yoga studio owner, instructor and fitness consultant. Grateful to be a native Californian where happily home-based.
Dittmore, Sarah. “Wrist Pain in Yoga? 12 Tips to Prevent Sore Wrists.” Yogabasics.com, February 15, 2022, https://www.yogabasics.com/connect/yoga-blog/wrist-pain-in-yoga/
Gudmestad, Julie, “Hand-Positioning Tips to Prevent Injury in Weight-Bearing Poses.” Yogajournal.com, August 28, 2007, https://www.yogajournal.com/poses/anatomy/hands-down/